

As websites become more popular and more highly trafficked things like request latency and scalability obviously become an issue. While it’s true that some requests are just always going take a certain amount of time (some amount of work being unavoidable) some work is avoidable. I’m speaking specifically about not repeatedly doing the work of re-producing the same results for different anonymous users time and time again by saving the results for use on subsequent requests.
Even more specificer I mean doing so with FastCGI requests.
- Considerations When Implementing a Cache
- How nginx Caching Works
- Configuring A Minimal FastCGI Cache
- A More Practical Example of a FastCGI Cache
- Managing Multiple Caches
- Comparison with Varnish
- Further Reading
Considerations When Implementing a Cache
Obviously, it’s all well and good to say “don’t do the same work over and over again” but how do we actually accomplish that goal without inhibiting the dynamic nature of our applications? After all, the main difference between a web application and a glorified brochure is the application’s ability to take arbitrary data, process it and render the results when appropriate.
So the main consideration when introducing any sort of caching (FastCGI or otherwise) is which operations are you looking to optimize by tolerating a delay in change propagation? That’s essentially what introducing a caching layer to an application accomplishes: Delaying updates for the sake of apparent speed.
Another consideration when implementing a cache is the possibility of bleed over. By this I mean if a particular page contains sensitive information and your caching layer is allowed to use that result as the cached result the subsequent users will gain access to information they otherwise wouldn’t. To avoid this carefully select the criteria for whose requests need to be saved.
If the person may run across sensitive information (or maybe just highly individuated information) then it’s important to make sure their requests aren’t saved to a cache used by other users. A good rule of thumb is to exempt as many requests from the generic cache as is reasonable. This often means to exempt them from caching altogether but could also mean that they get a private cache only their $remote_user (or whatever) maps to. However you do it, err on the side of caution and ask yourself whether or not a page or category of requests really need to be cached in the first place.
How nginx Caching Works
Most nginx caching, whether you’re using the proxy_* (HTTP proxying) uwsgi_* (proxying to a uWSGI application), or fastcgi_* family of directives involves the same principles. So if you learn how one caching system works, you can often just replicate that knowledge over to the other directives, only changing to account for the new context.
Firstly, when nginx receives a request for a resource that it deems to be backed by a given cache, it will attempt to locate it in directory specified by the relevant *_cache_path directive and failing that it will execute the request normally.
Once it has a “fresh” result nginx will take the key specified by the relevant *_cache_key directive and produce an md5 checksum from it, using this to uniquely identify a particular request. Once it has this hash it saves the backend origin’s response (including response headers) amongst other miscellaneous information to a flat file in the caching directory in a file named with the generated hash. In this way, when a request comes in, nginx will generate the key of the request, take an md5 hash of it and look for a file with that name.
Since websites can often have hundreds if not thousands of pages, if you save all the cached results to the same directory, you simplify the tree but all the dentries the OS now has to search through to find a file whose name matches. In addition, for certain filesystems it’s possible (though unlikely) to run up against a per-directory limit to the number of files.
To reduce the number of files per directory, you can modify the default behavior of nginx to create a directory structure and nest the cache files under a directory named after the hash’s least significant characters (i.e the characters on the far right). For example with a hash of 3b8b95c0f57df1b3ccd9a91a932fafcc the directory might be called cc whereas a hash of c98cdfa1efab42da49e4df9b0d0184a3 might be stored underneath a directory called a3. This directory structure can be modified with the levels= argument to the relevant *_cache_path directive. An example is shown below.
However it’s not enough just to save files to a cache and serve them again when a matching request comes in. You also must remove stale responses and prevent the cache from growing so large is takes up all disk space. Since this has to happen outside of the execution of a single request (otherwise requests would begin blocking and backing up) once a cache is defined, nginx will spawn a separate cache manager process in addition to the normal master and worker processes:
/var/cache/nginx # ps ax
PID USER TIME COMMAND
14977 root 0:00 /bin/sh
15008 root 0:00 nginx: master process nginx
15009 nginx 0:01 nginx: worker process
15010 nginx 0:00 nginx: cache manager process
This single monitors all configured cache and removes responses (by deleting the least-recently-used responses) either so that the cache is prevented from getting too large or to remove items legitimately stale.
Since the cache manager process exists outside of normal operation, users of open source nginx, the only means of updating the cache configuration that I’ve found to actually work is fully killing nginx and restarting it. For example:
/var/cache/nginx # killall -9 nginx ; nginx
/var/cache/nginx #
The plus version includes options for selectively reconfiguring cache management through the /api gateway though.
Obviously, nginx includes many tunable parameters/directives, the use of which will vary according to your needs/desires but the above should give you a firm basis for understanding what follows.
Configuring A Minimal FastCGI Cache
OK enough talk, let’s create a simple FastCGI cache on a generic uncomplicated nginx virtual host. In our example, we’re going to assume all HTTP requests are essentially identical and nothing is privileged (i.e so basic that you’re never going to run into this situation but it keeps the example uncomplicated).
Configuration-wise setting up a cache involves two basic steps:
- Creating the cache in the
http{}block of your configuration. This is where cache characteristic are defined:- A filesystem path is specified for the resulting files, cache size, along with the name of the cache (to be used elsewhere to refer to this cache).
- The “key” is defined which is the string used to identify whether two requests are identical as far as the cache is concerned. The should be as simple as possible so that your chances of finding a match in the cache are improved while being specified enough to never return unexpected/undesired pages.
- Cache behavior, such as how long to hold onto it
- Which headers to ignore, so that use of the cache happens according to administrative wishes and not the result of some
Cache-Controlheader sent by the backend server.
- The virtual host must be modified such that requests to the FastCGI process will point to the correct cache and modify response headers appropriately.
For the first step let’s add the following to our http{} block:
 fastcgi_cache_path /var/cache/nginx levels=1:2 keys_zone=appcache:10m
 fastcgi_cache_key $scheme$request_method$request_uri;
 fastcgi_cache_valid 5m;
 fastcgi_ignore_headers Cache-Control Expires Set-Cookie;
Let’s break that down a bit:
fastcgi_cache_pathEstablishes a new cache to be saved at/var/cache/nginxthat will be calledappcacheand with 10MB (10m) reserved for storing key-to-file-path mappings. Thelevels=parameter instructs the cache manager to create two levels of directories for each cache entry. The top level directory will be named after the last character of the entry’s md5 hash and the directory inside of that will be named after the2characters further left of that character. We could add a third level of directories using something likelevels=1:2:2but usually people are fine withlevels=1:2if you omitlevelsentirely then nginx will place all cache files in the same directory.fastcgi_cache_keyspecifies the key to use in determining whether two requests should produce identical responses. You’re free to use whatever you feel is unique enough given your application. In the above an example key might behttpsGET/newSite/list/and this is the key that would be hashed and used as the filename of the saved response.fastcgi_cache_validin our simplistic example sets the default TTL for cache entries to five minutes (5m). Optionally, you can also set different TTLs depending on the response code of the origin server. For example, you can cache200(successful) requests for a long time whereas you only hold onto307requests for a few minutes.- Finally we have
fastcgi_ignore_headersinstructs nginx to ignore the given headers if sent by the origin. This prevents the origin from setting its own cache time (producing unexpected results) or instructing nginx tono-cachethis result (bypassing the nginx cache altogether).
Now that we have our cache setup and configured, we need to actually instruct nginx to start using it for our application. Now we need to locate the location{} block where we’re proxying our requests and instruct nginx to use our appcache cache for these requests. An example of a valid location block would be:
location ~ \.php$ {

  include fastcgi.conf;
  fastcgi_cache appcache;
  fastcgi_pass unix:/run/php/joel.sock;

}
You’ll notice not much has changed from a run-of-the-mill barebones FastCGI configuration for nginx but we’ve added fastcgi_cache which points to the active cache.
After configuring the above, bring nginx to a full stop and restart it (remember, for caching changes, merely nginx -s reload is not enough). After requesting a few pages you should start seeing files like these start appearing underneath /var/cache/nginx:
/var/cache/nginx # find . -type f
./1/7/8c88010407e64d92ae2c1fa21399a271
./f/6/8caf507f6863cc0e006f6ad3862b4e6f
./2/e/2c74a38f17a6377bb62ead3f089c08e2
./8/e/d0c7f5739fddd8712ff820f2c1df72e8
./6/9/7e910f4487e6c16ee59ce6322658a696
./3/a/c98cdfa1efab42da49e4df9b0d0184a3
./c/c/3b8b95c0f57df1b3ccd9a91a932fafcc
./71/a2/8c88010407e64d92ae2c1fa21399a271
./6f/4e/8caf507f6863cc0e006f6ad3862b4e6f
./e2/08/2c74a38f17a6377bb62ead3f089c08e2
./e8/72/d0c7f5739fddd8712ff820f2c1df72e8
./96/a6/7e910f4487e6c16ee59ce6322658a696
./a3/84/c98cdfa1efab42da49e4df9b0d0184a3
./cc/af/3b8b95c0f57df1b3ccd9a91a932fafcc
Neat! If you’re paying attention, you should also be able to tell that your pages now open more quickly on average and are less susceptible to random slowdowns. That’s because all these requests are now backed by static files that nginx is now just slinging right back at you.
Consequently, if you want to manually clear the cache, it’s perfectly safe to just rm -rf /var/cache/nginx/* and nginx will generate a new page on the next request.
A More Practical Example of a FastCGI Cache
OK so with the above I’ve shown you what the absolute minimum you need to do to cache FastCGI-backed requests. It’s not terribly practical though. You may occasionally want to log into your CMS and it would be helpful if you did just get cached versions of the “Add Content” page forms or see the edits you’ve made to a particular page, etc. After all, the caching is for other users, if the page just isn’t snappy for you, that’s fine and you’ll just tolerate it.
So ok, keeping in mind what was said in the previous two sections (“Considerations When Implementing a Cache” and “Implementing a Minimal Cache”) how can we produce a more practical example. Well in a word: iteration. You want more than that? Fine. Each application is different so there is no “one size fits all” approach to which pages can be cached and for how long.
Let’s take the example of a Drupal website. In this situation, we have very few content editors (maybe one or two) but a huge number of people consuming the content we’re producing. The content isn’t dynamic at all outside of pages needing to be updated reasonably soon after the content editors are done with them. Traffic for this hypothetical site is fairly flat.
With that in mind I’ve produced the following to be added to a vanilla http{} block:
 fastcgi_cache_path /var/cache/nginx levels=1:2 keys_zone=appcache:10m inactive=10m max_size=200m;
 fastcgi_cache_methods GET;
 fastcgi_cache_key $scheme$request_method$request_uri;
 fastcgi_cache_lock on;
 fastcgi_cache_use_stale error timeout invalid_header updating http_500;
 fastcgi_cache_valid 10m;
 fastcgi_ignore_headers Cache-Control Expires Set-Cookie;
Let’s break that down now:
fastcgi_cache_path: We setup a cache similar to before, nginx still allocated 10MB of memory for key mapping, but now the cache manager will let the cache grow up to 200MB (max_size=) and will begin purging “inactive” content to maintain this limit, considering anything unaccessed after 10 minutes (10m) as being “inactive.”fastcgi_cache_methods: Limits caching to only GET requests. This is so only viewed pages even go through the cache. Narrowing the scope of the cache’s applicability helps ensure we don’t cache something we don’t want to. For sites like this, usually GET and HEAD requests tend to produce the same output anyways.fastcgi_cache_key: sets the key to uniquely identify this request in the cache. Same as before.fascgi_cache_lock: Prevents the same cache entry from being updated by two different requests. One request will get the lock and populate the result, once the other request(s) see the cache entry populate, it will be returned back to the clients.fastcgi_cache_use_stale: Controls in what situations nginx will continue to serve “stale” (i.e expired) content to users. In this example any sort of internal error (aHTTP/1.1 4xxresponse of some kind), timeout, or “unauthorized” message will result in nginx giving the user whatever happens to be in cache.fastcgi_cache_use_stale: Same as before, sets the default TTL in this cache to 10 minutes (10m).fastcgi_ignore_headers: Instructs nginx is ignore any of the given headers it gets from FastCGI. These particular headers could/would circumvent the cache or cause it to behave in ways we’re not specifying here so we ignore them.
OK so now we’ve setup the cache itself, let’s point our PHP application at it in the virtual host config. An example virtual host configuration might be:
server {
  listen 80 default_server;
  root /srv/drupal-7.0;
  index index.php;

    ## Try to use the cache wherever possible
  set $bypass_cache 0;

    ## cron.php must run every single time it's called
  if ($request_uri ~ "^/cron.php"){
    set $bypass_cache 1;
  }

  if ($request_uri ~ "^/admin/"){
   set $bypass_cache 1;
  }

    ## Logged in users never use the cache
  if ($http_cookie ~* "SESS[0-9a-z]+"){
    set $bypass_cache 1;
  }

  location / {
    try_files $uri $uri/ /index.php?$args;
  }

  location ~ \.php$ {

    include fastcgi.conf;
    fastcgi_cache appcache;
    fastcgi_cache_valid 200 20m;
    fastcgi_cache_bypass $bypass_cache;
    fastcgi_no_cache $bypass_cache;
    add_header X-Cache $upstream_cache_status;
    fastcgi_pass unix:/run/php/php7.sock;

  }

}
You’ll notice we’ve introduced a fair bit of something in the above:
- For one thing, we’re now dealing with a
$bypass_cachevariable. This variable gets used down in our otherwise-normallocation{}block by thefastcgi_cache_bypassandfastcgi_no_cachedirectives. Thefastcgi_cache_bypasswill bypass the cache for this request rather than finding an example in the cache. Since we Thefastcgi_no_cacheinstructs nginx to not save the response to the cache. Usually these two are used together as for situations like the above you neither want to serve the request out of cache or even have it available to be served just in case the cache isn’t bypassed for the given request for some reason. For both directives, passing a zero means to use the cache, whereas passing a non-zero value means to bypass the cache. - We’re checking to see if the request has a
SESSvariable which would denote a logged in Drupal user. Since we don’t want to cache these requests we set$bypass_cacheto one. - We’re also modifying the default TTL for all successful requests (i.e
HTTP/1.1 200responses from the backend) to 20 minutes (20m) instead of the regular cache default of 10 minutes. - Finally we’re adding a response header to be sent to the browser. This header is called
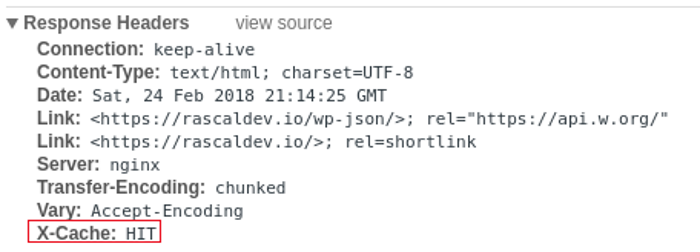
X-Cacheand its value will be the same as$upstream_cache_statuswhich will expand into whether or not nginx found a hit for this request in its cache. This is useful when troubleshooting website behavior as it lets you know from the browser output whether or not the page you’re looking at is coming from the cache. For example, from my Chrome developer tools:
Managing Multiple Caches
I’m sure you get the idea by now so I’m going to opt for a high level explanation here rather than list out example configurations.
Honestly, there aren’t many cases where having multiple caches make sense. Usually if you’re at the point where you need to start caching FastCGI then your ratio of nginx instances to application instances is already 1:1 and rarely does a single application need more than one cache. Usually either a given request can be cached, or it can not. If you need to make pages specific to particular users you would normally just include user-identifying information in the fastcgi_cache_key parameter (for example $remote_user or a cookie value).
There may be situations, though where you need more than one cache. maybe this cache is on faster storage (tmpfs vs HDD) or can grow larger, or maybe you want to conditionally adjust the TTL for certain requests via fastcgi_cache_valid such that requests going to this new cache stick around longer.
The fastcgi_cache_path will allow you to establish multiple caches as needed and just prior to fastcgi_pass just make sure fastcgi_cache is set to the alternative cache.
Comparison with Varnish
Caching the responses you get from FastCGI is obviously not the only way to avoid duplicate work. There’s also the possibility of partial or full page caching. One of the most popular accelerators in this domain would be Varnish. So how does Varnish stack up against FastCGI caching?
Benchmarking
First let’s establish a baseline on a quad core machine with a test wordpress instance randomly pulling 20 articles:
![]()

So we have an average latency of 1.3 seconds with a pretty tight standard deviation coming in at 151ms.
Let’s run the same test through Varnish on the same machine with storage set to malloc,512M:

As you can see since our requests were imminently cacheable the average latency went down about 80% (wow). The standard deviation stayed about as tight as our baseline as well.
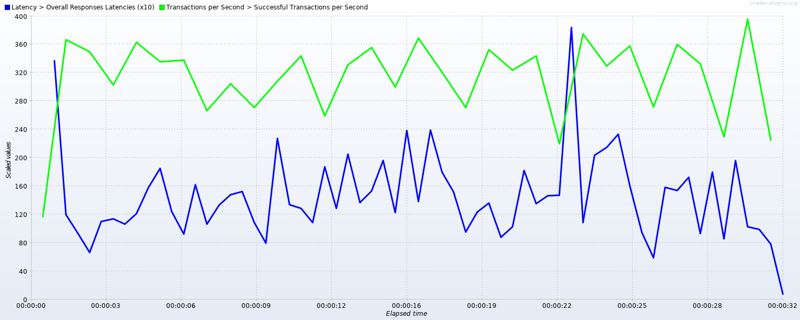
Finally, let’s look at the same test ran against a FastCGI cache running inside nginx:


So our average latency actually went up using only FastCGI caching. The Varnish cache was about 9.3% faster than the nginx cache. Why? Well by default Varnish does full page caching. Every image and css file you request gets saved in physical memory. This in contrast with nginx’s FastCGI caching that only caches the PHP execution results and stores them in flat files (depending on the operating system’s filesystem cache to keep the contents in memory).
Feature Comparison
Ok so overall performance behavior is only one feature. When do we know when we want to use FastCGI caching?
Good Reasons To Use FastCGI Caching:
- You want a single stack solution rather than introducing another executable into the mix somewhere. This will consolidate the configuration applicable to your application’s delivery by eliminating another moving part and allow you to only have to monitor or learn about nginx.
- You need to do SSL termination on the host. Varnish doesn’t support this out of the box and is the motivation behind their development of the
hitchcompanion daemon. - Your FastCGI backend is itself load balanced. Varnish doesn’t communicate over FastCGI and instead only over HTTP. Additionally, Varnish can have multiple backends but it can only round robin between them. For advanced load balancing behavior (such as active-passive or sticky sessions) nginx caching is the only option.
Good Reasons to Use Varnish Caching:
- Your website is under such heavy load that the 8% gain is the of vital importance.
- You want to take advantage of Edge Side Includes (ESI). nginx will cache the entire results of a page into its cache with no option to be more granular. This means, for example, that if you have a Drupal block that takes a while to generate then you’re left with either caching the entire page which may include dynamic data outside of the latency-inducing block that you don’t want to slow down. With Varnish, if the application supports it, you can be more selective about what you’re caching.
- You can’t trust nginx’s reliance on the filesystem cache due to possible contention issues. Varnish locks its pages into memory so the cached items are immediately available.
Further Reading
- (rascaldev) Configuring nginx for PHP-FPM
- (rascaldev) Tuning PHP’s FastCGI Process Manager (PHP-FPM)
- Nginx Docs: Module ngx_http_fastcgi_module
- Digital Ocean: How to Setup FastCGI Caching with Nginx on your VPS