

Overview
Previously, I showed you five different ways to easily install Kubernetes. That previous post isn’t exactly enough to truly “get started” with Kubernetes though. It really only gets you to the point where you can technically run pods and deployments. In this series of posts I’m hoping to dive a little deeper, plan in a little more detail, and hopefully end up with a cluster that’s more representative of something you would actually want to use.
For simplicity’s sake, we’ll be using kubespray to leverage Ansible for the installation. This removes a lot of the manual steps but you should still expect some amount of configuration. Given that fact, this tutorial also assumes a basic familiarity with YAML and basic Ansible knowledge. I try my best to explain in detail what I’m doing but it’s best if you start this series already having an understanding of how inventory files and variables work in Ansible.
Once done with this series you’ll be able to know how to:
- Manually install Kubernetes with high availability so that the API server can undergo maintenance or taken offline without impeding overall cluster functionality.
- Deploy some basic services that will help make monitoring the cluster easier.
- Securing the Kubernetes infrastructure by controlling host access, encryption, and principle of least privilege.
- Deploying a realistic Flask application (written in Python) structured in a service-oriented manner that can dynamically scale its components.
- Learn how to conduct basic cluster monitoring with Grafana and Prometheus.
With that out of the way, let’s get started…
Target Architecture
Basic Kubernetes Architecture
Before understanding where we want to end up, let’s understand what a bare bones vanilla Kubernetes cluster looks like. Take a look at this diagram:
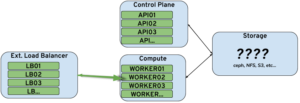
This diagram depicts the four basic components of a vanilla Kubernetes cluster. Two components are internal whereas the other two are assumed external components outside of the purview of Kubernetes:
- The External Load Balancer which takes traffic from the outside world destined for applications running on the cluster. Depending on the load balancer used, Kubernetes may be able to automatically configure new services when a Kubernetes service is created. Otherwise some process must exist for reconciling Kubernetes services with the services exposed by the load balancer.
- The Storage being provided to the cluster. This exists on systems separate from the Kubernetes nodes but accessible. This is because storage is considered a separate problem domain in many systems with its own challenges (availability, integrity, encryption, etc) and wouldn’t normally be a problem Kubernetes would be well suited to handle.
- The Control Plane which provides the actual orchestration of Kubernetes. These machines are where the main part of what is “Kubernetes” runs. They store all the API objects in an etcd database, they determine what pods run where and what configuration data they have access to, etc. There can be an arbitrary number of these as deemed appropriate to run the orchestration functions of the cluster.
- The Compute nodes are where the actual applications run. These have some amount of local storage to service the operating system and the ephemeral pods that Kubernetes will spin up but ideally these nodes (along with any given individual control plane node) should be interchangeable. Ideally, you should be able to add or remove compute nodes without worrying about losing any important data or have the application impacted.
Not depicted in the diagram is that all the components of the Kubernetes cluster (the API server, the kubelet API client running on the compute nodes, etc) communicate internally amongst themselves via an overlay network. We will go into more detail later but the overlay network is required so that Kubernetes can automatically assign IP addresses to pods, services, etc without needing a DHCP server. Additionally, many of the overlay networks supported by Kubernetes allow for over-the-wire encryption in case you have confidentiality requirements and are running on an untrusted network.
Another point on the above diagram: it’s just an illustrative reference point for a Kubernetes cluster, and it represents what we’ll be using here. It is by no means the only way to do things, though. Some distributions of Kubernetes for instance run management functions like logging or metrics gathering on separate nodes. Others have separate nodes that exist only for the network traffic. This however will get us started and clearly demonstrates the role each plays in the Kubernetes stack.
A Note About The Load Balancing…
For high availability all services (including the Kubernetes control plane) will be accessed via a load balancer called lb01.
Since load balancers are usually available on most enterprise networks in the form of either F5 LTM ‘s or those available with most cloud providers, I’ll consider the load balancer implementation as being out of scope and will only vaguely reference what is being load balanced and generally how. If you don’t have access to a load balancer, you can see my previous posts about haproxy and nginx for instructions on how to configure those for simple load balancing.
If you want to best reproduce the results I get here, I’m using the same manually configured nginx (FOSS version) load balancer for both the API server and the service exposed.
Understanding Where We Want To End Up…
Since this will nominally be a “production” cluster, we need to be sure we know how the cluster will eventually end up looking. All the decisions we make at the outset should allow for all the functionality required without major modification to fundamental cluster characteristics later on.
As mentioned in the previous section we already know three things:
- What the cluster layout and major components are.
- What the functional requirements are (highly available control plane, disposable compute nodes, etc).
- How we plan on deploying the cluster initially (via kubespray).
Before we start building our VM’s though we need to determine the network address layout our cluster will operate within. Since Kubernetes uses an overlay network for communication between pods, we need to ensure that IP’s used for the overlay network do not overlay with important legitimate IP’s elsewhere on the network. To this end lets plan out our IP addresses so that we know everything is aligned:
| Hostname | CIDR | Description |
|---|---|---|
| Load Balancer VIP | 192.168.122.14 | External to the cluster itself. Frontends the API server and any services this cluster exposes. |
| Node IP Range | 192.168.122.0/24 | Regular non-overlay network IP addresses for the machines. |
| Overlay Network | 10.40.0.0/16 | IP Address range available for Kubernetes overlay network. |
Not mentioned above but also relevant, all of my virtual machines are running CentOS 8 with SELinux disabled. SELinux is compatible with Kubernetes, but to minimize the room for error, I would recommend disabling it until you get used to this procedure.
OK so we have a general sense of the shape of things, lets see what Kubernetes can do to get us there.
Understanding What We’ll Need To Get There…
We now know what we want to end up with, but what’s required to make it happen from a resources point of view? I will be using the following addressing scheme:
| Hostname | Function | IP Address | Resources |
|---|---|---|---|
| lb01 | Load Balancer | 192.168.122.11 | 2GB Memory 2 Cores No Add'l Storage |
| kube-control01 | First Control Plane Instance | 192.168.122.51 | 2GB Memory 2 Cores No Add'l Storage |
| kube-control02 | Second Control Plane Instance | 192.168.122.52 | 2GB Memory 2 Cores No Add'l Storage |
| kube-control03 | Third Control Plane Instance | 192.168.122.53 | 2GB Memory 2 Cores No Add'l Storage |
| kube-compute01 | First Compute Node | 192.168.122.61 | 10GB Memory 4 Cores No Add'l Storage |
| kube-compute02 | Second Compute Node | 192.168.122.62 | 10GB Memory 4 Cores No Add'l Storage |
| kube-compute03 | Third Compute Node | 192.168.122.63 | 10GB Memory 4 Cores No Add'l Storage |
So as you can see, we’re going to end up with three control planes and three workers. This distribution of nodes is a little unrepresentative of an actual cluster (normally you would have far fewer control nodes than compute nodes) but since this article is written with the idea that one can run this on a few VM’s running on a powerful enough desktop I had to limit the number of compute nodes to just three.
Even in real deployments though, you need either a cluster with three or more control nodes. This is because the database Kubernetes uses (etcd) requires a simple majority to reach quorum. You can get around this in single node clusters but our goal here (and would be our goal in the enterprise) is to have a highly available control plane where any single node can go missing and the cluster is alright.
Now that we know what we need, let’s set up our new cluster.
Installing The Cluster
Now that we have a pretty clear idea of where we want to end up, let’s get the actual cluster running.
Downloading and Configuring kubespray
First download the upstream repository and remove the default inventory files:
👤 ~/src/k8s> git clone https://github.com/kubernetes-sigs/kubespray.git
Cloning into 'kubespray'...
remote: Enumerating objects: 45272, done.
remote: Total 45272 (delta 0), reused 0 (delta 0), pack-reused 45272
Receiving objects: 100% (45272/45272), 13.20 MiB | 28.33 MiB/s, done.
Resolving deltas: 100% (25231/25231), done.
👤 ~/src/k8s> cd kubespray
👤 ~/src/k8s/kubespray> rm -rf inventory/*
Now populate a basic inventory file at inventory/all with the following:
[kube-master]
kube-control01
kube-control02
kube-control03

[etcd]
kube-control01
kube-control02
kube-control03

[kube-node]
kube-compute01
kube-compute02
kube-compute03

[k8s-cluster:children]
kube-master
kube-node
The above designates which hostnames will serve which function in our cluster. You’ll notice that the etcd database can technically be housed on systems other than the API servers but for simplicity’s sake, we’re keeping all etcd instances on each API server’s local node.
Next we need to configure kubespray to deploy the type of cluster we’re after. Create a directory called inventory/group_vars and then populate a file at inventory/group_vars/all with the following:
kube_network_plugin: weave
kube_basic_auth: true
kubeconfig_localhost: true

apiserver_loadbalancer_domain_name: "api.rdev"
kube_pods_subnet: "10.40.0.0/16"
kube_service_addresses: "10.40.64.0/18"

kube_users:
  readonly:
    pass: "kube"
    role: "system:view"
  newadmin:
    pass: "kube"
    role: "cluster-admin"
    groups:
    - "system:masters"
Breaking down the above kubespray config:
kube_network_pluginspecifying the type of overlay network we’re wanting. By default kubespray will install Calico but in our case we’re wanting Weave networking.- Though not weave specific, we also must use
kube_pods_subnetandkube_service_addressesspecify in CIDR notation what network block we expect weave to use for addressing.
- Though not weave specific, we also must use
weave_passwordsets the shared secret all nodes use to establish over-the-wire encryption with weave net. This is an optional parameter but without it we lose encryption.apiserver_loadbalancer_domain_namesets the hostname that will be added to all masters’ x509 certificates as a possible alternate name. This needs to be set to whatever hostname is associated with the load balancer servicing the cluster.kube_basic_authandkube_usersare both required to populate the new cluster with two users:newadminis a user with administrative access to the clusterreadonlyis a user that only has the ability to read Kubernetes resources but not modify anything.- The password for each user is simply
kube - I won’t explore this in too much detail right now as there’s a separate installment in this series that deals with access control mechanisms
kubeconfig_localhostensures kubespray will put a copy of the new cluster’s kubeconfig credentials onto the host executing the playbook. This is a separate account from the previous admin and is the default administrator that kubespray generates and instead of passwords, it uses x509 certificates stored in the kubeconfig.
Installing The Cluster
Once we’ve got the above configured as needed, we can invoke the playbook with a command similar to:
👤 ~/src/k8s/kubespray> ansible-playbook -bi inventory/all cluster.yml
[....snip....]
PLAY RECAP ********************************************************************************************************************************************************************************************************
kube-compute01             : ok=347  changed=73   unreachable=0    failed=0    skipped=541  rescued=0    ignored=0
kube-compute02             : ok=347  changed=73   unreachable=0    failed=0    skipped=540  rescued=0    ignored=0
kube-compute03             : ok=347  changed=73   unreachable=0    failed=0    skipped=540  rescued=0    ignored=0
kube-control01             : ok=572  changed=120  unreachable=0    failed=0    skipped=1068 rescued=0    ignored=0
kube-control02             : ok=501  changed=108  unreachable=0    failed=0    skipped=907  rescued=0    ignored=0
kube-control03             : ok=503  changed=109  unreachable=0    failed=0    skipped=905  rescued=0    ignored=0
localhost                  : ok=1    changed=0    unreachable=0    failed=0    skipped=0    rescued=0    ignored=0

Sunday 05 July 2020  20:02:40 -0400 (0:00:00.048)       0:09:26.461 ***********
===============================================================================
container-engine/docker : ensure docker packages are installed -------------------------------------------------------------------------------------------------------------------------------------------- 47.97s
kubernetes/kubeadm : Join to cluster ---------------------------------------------------------------------------------------------------------------------------------------------------------------------- 30.48s
kubernetes/master : kubeadm | Init other uninitialized masters -------------------------------------------------------------------------------------------------------------------------------------------- 21.79s
kubernetes/master : kubeadm | Initialize first master ----------------------------------------------------------------------------------------------------------------------------------------------------- 21.33s
download : download_file | Download item ------------------------------------------------------------------------------------------------------------------------------------------------------------------ 18.51s
download : download_file | Download item ------------------------------------------------------------------------------------------------------------------------------------------------------------------ 13.25s
bootstrap-os : Install libselinux python package ---------------------------------------------------------------------------------------------------------------------------------------------------------- 12.32s
etcd : Gen_certs | Write etcd master certs ---------------------------------------------------------------------------------------------------------------------------------------------------------------- 11.85s
etcd : Gen_certs | Write etcd master certs ---------------------------------------------------------------------------------------------------------------------------------------------------------------- 11.23s
download : download_container | Download image if required ------------------------------------------------------------------------------------------------------------------------------------------------ 10.49s
download : download_container | Download image if required ------------------------------------------------------------------------------------------------------------------------------------------------- 9.54s
download : download_container | Download image if required ------------------------------------------------------------------------------------------------------------------------------------------------- 9.26s
Gather necessary facts ------------------------------------------------------------------------------------------------------------------------------------------------------------------------------------- 9.19s
download : download_container | Download image if required ------------------------------------------------------------------------------------------------------------------------------------------------- 8.71s
kubernetes/preinstall : Install packages requirements ------------------------------------------------------------------------------------------------------------------------------------------------------ 8.03s
download : download_container | Download image if required ------------------------------------------------------------------------------------------------------------------------------------------------- 7.90s
download : download_container | Download image if required ------------------------------------------------------------------------------------------------------------------------------------------------- 7.45s
etcd : reload etcd ----------------------------------------------------------------------------------------------------------------------------------------------------------------------------------------- 7.40s
download : download_container | Download image if required ------------------------------------------------------------------------------------------------------------------------------------------------- 7.10s
download : download_container | Download image if required ------------------------------------------------------------------------------------------------------------------------------------------------- 6.39s
Validating The Cluster
Once the playbook finishes executing without failures you should be able to execute kubectl commands using the kubeconfig deposited locally. For example:
👤 ~/src/k8s/kubespray> export KUBECONFIG="$PWD/inventory/artifacts/admin.conf"
👤 ~/src/k8s/kubespray> kubectl get nodes
NAME             STATUS    ROLES     AGE       VERSION
kube-compute01   Ready               13m       v1.18.5
kube-compute02   Ready               13m       v1.18.5
kube-compute03   Ready               13m       v1.18.5
kube-control01   Ready     master    15m       v1.18.5
kube-control02   Ready     master    14m       v1.18.5
kube-control03   Ready     master    14m       v1.18.5
You can also check the status of the overlay network using the curl command:
👤 ~/src/tmp/kubespray> ssh kube-control01 curl -s http://localhost:6784/status
        Version: 2.6.5 (version check update disabled)

        Service: router
       Protocol: weave 1..2
           Name: 2a:18:d9:07:e7:9d(kube-control01)
     Encryption: enabled
  PeerDiscovery: enabled
        Targets: 5
    Connections: 5 (5 established)
          Peers: 6 (with 30 established connections)
 TrustedSubnets: none

        Service: ipam
         Status: ready
          Range: 10.40.0.0/18
  DefaultSubnet: 10.40.0.0/18
You can see in the above that Encryption has been enabled and all peers (all six of them) appear to Ready in kubectl and are established in the WeaveNet status above.
Accessing The Cluster With kubectl
Logging Into The Cluster
When interacting with Kubernetes directly, the main client executable you’re going to be using (besides curl) is going to be kubectl. Given that, I’m going to take some time to familiarize you with how to use the utility.
As mentioned above, when the cluster is finally installed we end up with three user accounts:
- The default cluster administrator account that authenticates with x509 certificates.
- A custom
newadminuser account that has been given administrative control over the entire cluster and is identified by the password kube. - A custom
readonlyuser account that can only view objects but can not delete anything.
The default path for kubectl‘s config file (referred to here as kubeconfig) is $HOME/.kube/config in the user’s home directory. We’re going to start from scratch though so go ahead and rm -rf $HOME/.kube and we’ll go through the process of setting up a new default context.
kubectl is designed to be able to store and differentiate between the various clusters you may be logged into at the same time. Each of these client configuration profiles is referred to as a “context” and you need to have at least one context. In my example, I did the following:
👤 ~/src/tmp/kubespray> kubectl config set-credentials newadmin/rdev --username=newadmin --password=kube
User "newadmin/rdev" set.

👤 ~/src/tmp/kubespray> kubectl config set-cluster api.rdev --insecure-skip-tls-verify=true --server=https://api.rdev:6443
Cluster "api.rdev" set.

👤 ~/src/tmp/kubespray> kubectl config set-context default --user=newadmin/api --namespace=default --cluster=api.rdev
Context "default" created.

👤 ~/src/tmp/kubespray> kubectl config use-context default
Switched to context "default".

👤 ~/src/tmp/kubespray> kubectl get nodes
NAME             STATUS    ROLES     AGE       VERSION
kube-compute01   Ready     <none>    4m26s     v1.18.5
kube-compute02   Ready     <none>    4m13s     v1.18.5
kube-compute03   Ready     <none>    4m13s     v1.18.5
kube-control01   Ready     master    5m54s     v1.18.5
kube-control02   Ready     master    5m24s     v1.18.5
kube-control03   Ready     master    5m24s     v1.18.5
Breaking down each command above:
- First we create a
credentialrecord in our local configuration callednewadmin/apiwhich uses thenewadminusername/password we configured above. These credentials will then be used to perform regular HTTP Basic authentication to the server. - We then create a cluster record in our local configuration called
api.rdevsetting the server associated with the cluster to be the load balancedapi.rdevVIP. - We tie both the credentials and the cluster records together with a context record called simply
default. - This new context is just sitting inert though until we mark it active be using the
use-contextsubcommand to switch to this new context. - Finally we test out credentials out by issuing a kubectl get nodes command.
Please note that all my names above are purely arbitrary and the only requirements are that they’re each unique and they’re memorable enough to you so that ten months down the line you can still easily tell if newadmin/api is still needed.
If you ever need to examine your kubectl configuration you can use kubectl config view like so:
👤 ~/src/tmp/kubespray> kubectl config view
apiVersion: v1
clusters:
- cluster:
    insecure-skip-tls-verify: true
    server: https://api.rdev:6443
  name: api.rdev
contexts:
- context:
    cluster: api.rdev
    namespace: default
    user: newadmin/api
  name: default
current-context: default
kind: Config
preferences: {}
users:
- name: newadmin/api
  user:
    password: kube
    username: newadmin
Basic Kubectl Usage
I will try my best to explain the commands I use but in the interests of time, let me explain how a little more about how to use the kubectl command.
The basic syntax for most kubectl commands is: kubectl <verb> <resourceType>
In Kubernetes speak a “verb” is the action intended to be performed. Common verbs include:
getfor retrieving lists of a particularkindof resource.describefor retrieving details of a particular instance of resourcedeletefor removing a particular instance of a resources.editfor modifying an existing resource instance in your preferred command line editor.createfor creating new objects either from source YAML files or from command line options.
Some common resource types include:
nodesare the underlying machines running Kubernetes and scheduling pods.podsare the smallest unit of work with Kubernetes applications.deploymentsare a sort of “meta” object which will spawn new pods as needed to meet distribution and/or availability requirements.servicesexpose application services either over the local overlay network or externally through your load balancer.
If you ever find yourself needing to find out more about a particular resource type you can use kubectl explain <resourceType> to produce a summary of the object type. For example, kubectl explain nodes will explain what a “node” is and what the different fields on the object actually mean.
Finally, it’s important to remember that Kubernetes is a namespace-aware service. Namespaces are how different projects (and their users) are isolated from each other. For example, storage can be made available only to pods running within a certain namespace or users can be isolated to only a certain namespace, unable to interact with anything outside of it.
By default post installation there are four namespaces, but only two are important for now: default and kube-system. The default namespace is an empty namespace created post-install to host your applications. The kube-system namespace though houses all the daemons and applications required for Kubernetes itself to function (for example WeaveNet runs here as does the cluster DNS).
You can specify the namespace you desire with the -n option. For example, to list the services currently in the kube-system namespace:
tests@workhorse-pc:~$ kubectl get services -n kube-system
NAME                        TYPE        CLUSTER-IP     EXTERNAL-IP   PORT(S)                  AGE
coredns                     ClusterIP   10.40.64.3     <none>        53/UDP,53/TCP,9153/TCP   45m
dashboard-metrics-scraper   ClusterIP   10.40.80.166   <none>        8000/TCP                 45m
kubernetes-dashboard        ClusterIP   10.40.64.115   <none>        443/TCP                  45m
Some resources (such as nodes or ClusterRoles) aren’t considered namespaced resources because they transcend any particular group of applications or users. For these any namespace argument is silently ignored.
Next Steps
This is just the first article in a series of articles, once you feel comfortable with the above, we can continue onto part two where we will begin deploying test applications to our cluster.